Call For A Free Estimate
How to Prep a Deck for Painting: Expert Tips and Techniques
Preparing your deck for painting is a crucial step to ensure a long-lasting, professional finish. You need to focus on removing loose paint and cleaning the surface thoroughly, as this is the key to a successful paint job. An efficient practice involves using a pressure washer to eliminate dirt and debris, ensuring the deck is dry before applying any product.
Sanding the deck will further smooth out imperfections and allow the paint to adhere more effectively. It's important to assess the weather conditions since a dry, mild day is ideal for applying paint. By properly preparing your deck, you'll extend the life of the paint and enhance the appearance of your outdoor space.
If you find yourself needing assistance with this process, Great Harbors Home Services in Cape Cod is here to help. With our expertise, your deck will look renewed and protected against the elements, ready to enjoy for years to come.
Assessing Deck Condition
Before you begin painting your deck, it's crucial to evaluate its current condition to ensure the best results. Understanding areas of damage and choosing between paint and stain are key considerations that can significantly impact the project outcome.
Inspecting for Damage
Start by thoroughly examining your deck for any signs of structural issues or surface damage. Check for loose or rotting boards, which could pose safety hazards or affect the paint's adherence. Additionally, look for protruding nails and replace them with deck screws to ensure safety and stability.
Decay often occurs in shaded or high-moisture areas. Use a screwdriver to test the wood's firmness; soft spots indicate rot and need replacement. If you're in the Cape Cod area, Great Harbors Home Services can help assess and repair these damages before you proceed with painting.
Evaluating Paint vs. Stain
Understanding whether to apply paint or a solid stain to your deck involves considering the aesthetics and level of coverage you desire. Paint offers durability and vibrant color options, effectively hiding imperfections. However, it may peel over time if not applied correctly. Solid stains penetrate the wood and are less likely to peel. They enhance the natural texture while providing UV protection and a uniform color.
Cost and maintenance levels also differ. Paint typically requires more frequent touch-ups, while stains may lighten but won't peel as paint does. Your choice might depend on personal preference and the deck's wear. For expert advice tailored to your home's specific needs, Great Harbors Home Services can guide you through the decision-making process.
Preparation and Cleaning
When prepping a deck for painting, thorough cleaning and preparation are crucial. This includes removing all items from the deck, ensuring the surface is free from dirt, old finishes, and debris, and applying a deck cleaner to maintain the quality of the surface.
Clearing the Deck
Start by removing furniture, potted plants, and any other items from the deck. This will provide a clear space to work and prevent any damage or interference during cleaning and painting. Use plastic sheeting to cover nearby plants or structures to protect them from cleaning chemicals or debris.
Inspect the deck for damaged areas such as loose nails or rotten wood. Repair these issues to prepare the surface effectively for painting. Proper repairs ensure the paint adheres better and extends the deck's lifespan.
Pressure Washing the Surface
Once the deck is cleared and repaired, use a pressure washer to clean the entire surface. Pressure washing effectively removes dirt, old finishes, and mildew that ordinary cleaning might miss. Use a fan spray nozzle to avoid damaging the wood, keeping the pressure washer nozzle moving for uniform cleaning.
For best results, work in sections and maintain a consistent distance from the surface. Pressure washing is a crucial step, as it opens up the wood grain for better paint adhesion. If you need help, Great Harbors Home Services can assist with power washing in Cape Cod.
Applying Cleaner
After pressure washing, apply a specialized deck cleaner to further remove any remaining dirt or stains. Choose a cleaner suitable for your deck wood type. Follow the manufacturer's instructions for dilution and application using a stiff broom or brush to scrub the cleaner into the wood grain.
Let the cleaner sit for the recommended time to break down stubborn stains and residues. Thoroughly rinse the deck with clear water to remove the cleaner. Proper cleaning ensures a smooth surface, ready for painting, allowing the new paint to stick effectively and look its best. For professional cleaning services, consider reaching out to Great Harbors Home Services.
Sanding and Repair
Preparing your deck for painting involves careful sanding and thorough repairs. Proper sanding ensures a smooth surface, while timely repairs help maintain the deck's structural integrity and appearance.
Sanding the Wood
Before painting, it's essential to sand the deck to remove old paint, rough spots, and any splinters. Use a power sander with 40-60 grit sandpaper for heavy duty sanding on particularly worn areas. For a smoother finish, switch to an 80-120 grit sandpaper, which helps prepare the surface for better paint adhesion. Working in the direction of the wood grain is crucial to prevent scratches and avoid damage.
Pay extra attention to railings and edges, as these areas often need finer sanding to achieve a uniform texture. After sanding, clean the deck thoroughly to remove all dust, as this will improve paint bonding. Great Harbors Home Services emphasizes the importance of precise sanding for optimal results in deck refinishing.
Repairing Deck Boards
Inspect and repair any loose or damaged boards before painting. Secure loose boards with weatherproof screws to ensure stability. For boards showing signs of decay, consider replacing them entirely to prevent further deterioration. Fill small cracks or holes with a wood filler, ensuring it is suitable for outdoor use.
Examine the support structure to ensure there are no underlying issues affecting the deck's stability. Address any rusted nails or screws by replacing them to maintain the deck’s safety and appearance. Great Harbors Home Services in Cape Cod, Massachusetts, focuses on meticulous repairs to ensure each deck we touch is as strong as it looks beautiful.
Priming and Taping
Painting a deck involves careful preparation, especially when it comes to priming and taping. Priming helps to ensure better adhesion of the paint, extending the life of the finish, while taping protects areas that need to remain paint-free and helps achieve clean edges.
Applying Primer
Applying primer to your deck is a crucial step. It creates a smooth surface and helps the paint adhere better. Start by selecting a primer compatible with the type of paint you will use. For example, a latex primer pairs well with latex paint.
Begin by cleaning the deck thoroughly, as any dirt or grease can reduce the primer’s effectiveness. Use a paintbrush or roller to apply an even coat, ensuring full coverage of every board.
Allow the primer to dry completely before painting. This drying time can vary, so check the manufacturer's instructions. At Great Harbors Home Services, we emphasize patience during this phase to ensure the best results. Skipping or rushing the priming step can lead to a shorter lifespan of your deck's finished look.
Taping Edges and Fixtures
Taping is an important step to maintain clean lines and protect areas not meant for painting. Use quality masking tape to cover edges, railings, or any deck fixtures. This prevents paint from accidentally getting onto these surfaces.
Press the tape firmly along the edges to ensure there are no gaps where paint could seep through. It's helpful to begin taping from one end of the deck and work your way to the other, ensuring consistent coverage.
Remove the tape as soon as the paint is dry to touch but before it's fully cured for the cleanest lines. As you carefully peel it off, do so at a 45-degree angle to minimize any tearing. Whether you're a DIY enthusiast or seeking professional help, like that from Great Harbors Home Services, careful taping is a key component of a professional-looking finish.
Painting the Deck
When it comes to painting a deck, attention to detail is critical. Selecting the appropriate materials and using the right techniques will ensure a long-lasting and beautiful finish. Consider the specifics of paint and application tools in order to achieve the best results.
Choosing the Right Paint or Stain
Selecting the correct paint or stain is crucial. For decks, you might opt for a solid stain, which provides a uniform appearance while allowing some wood grain to show through. This option is popular for its durability and ability to handle foot traffic. Brands like Sherwin Williams offer a wide range of choices tailored for outdoor use.
If you prefer paint, ensure it is formulated for exterior wood surfaces. Look for options that resist peeling and fading. Your selection can significantly impact how long your deck remains in good condition, helping to avoid frequent reapplications and preserving your curb appeal.
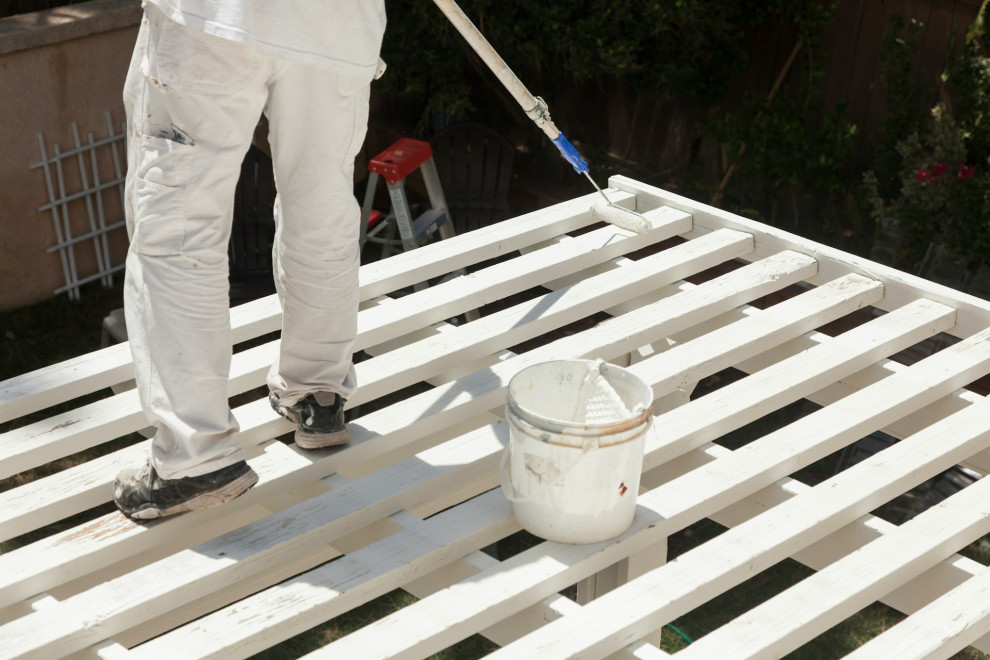
Using Rollers and Brushes
Application tools play an essential role in deck painting. Rollers ensure quick coverage of large areas, making them ideal for the deck floor. Choose a roller with a long handle for easy reach and a nap suited to the texture of your wood.
For corners and intricate sections, a quality paint brush is indispensable. A brush allows for precision application and ensures that paint reaches all crevices. It also helps in achieving a smooth, even coat without missing any spots. Great Harbors Home Services recommends combining both tools for the best results.
Applying Multiple Coats
Applying multiple coats can enhance the longevity of your paint job. Begin with a thin, even base coat that acts as a primer, allowing it to dry thoroughly before proceeding. Depending on your chosen product, two to three coats may be necessary for optimal protection.
Allow each coat to dry fully to prevent peeling and ensure adhesion. Using this technique will provide a thicker, more protective layer that will defend against the elements. Our team at Great Harbors Home Services emphasizes the importance of ample drying time between coats for a durable and polished finish.
Feel free to seek expert advice on deck painting that promises to enhance your home’s exterior from professionals like us at Great Harbors Home Services.
Frequently Asked Questions
Preparing your deck for painting involves several crucial steps to ensure a lasting finish. Proper cleaning, surface preparation, and understanding the differences between painting and staining are essential for a successful outcome.
What is the best method to clean a deck before painting?
Cleaning is the first crucial step. Using a deck cleaner and a stiff broom can effectively remove dirt, mold, and mildew. A neutralizer might also be necessary to ensure a clean surface. For more information, see here.
Is it necessary to sand a deck before painting, and what are the alternatives?
Sanding helps remove any loose paint and creates a smooth surface that paint can adhere to. Alternatives include using chemical strippers or pressure washers to remove old paint layers. Proper drying time for the wood is crucial before application, as shared on some forums.
Should a deck be pressure washed before painting, and if so, what technique should be used?
Pressure washing can be effective in removing embedded dirt and loose paint. It's essential to use a moderate pressure setting to prevent wood damage. Ensure the deck is thoroughly dry before moving on to painting, as outlined in the complete guide.
What steps should be followed to effectively prepare a previously painted deck for repainting?
Start by removing all loose paint and any existing stains or sealers. Use a stain and sealer remover if necessary, as stains do not adhere well to others. Deck care FAQs suggest these steps to ensure a fresh and durable finish.
Can a roller be used to apply paint on a deck, and how should the deck be prepped for this?
A roller can be an efficient tool for applying paint. Ensure the deck is clean and smooth for an even application, which can often be achieved after sanding. Rolling allows for quick coverage, but detailed areas may still require a brush for precision.
What are the key differences between painting and staining a deck in terms of preparation?
Painting generally requires more extensive surface preparation, including cleaning, sanding, and primer application, to ensure paint adheres and lasts. Staining, on the other hand, often involves cleaning and a more straightforward application process. Proper preparation is crucial for both to maximize longevity and enhance appearance.
For assistance with deck painting or other projects in Cape Cod, consider reaching out to Great Harbors Home Services for expert advice and services.